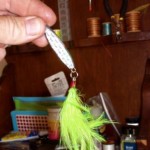
 I can’t remember when I first learned to make fishing lures, but it seems like I’ve always made them. Some of my earliest childhood memories include the times my brothers and I spent with our father in his garage workshop in the hills of Tennessee. There were always lures lying around in various stages of creation. Dad melted a lot of lead and made a lot of plastic worms. I’ll never forget the terrible smell of that little shop. Sometimes the smoke was so thick from burning plastic that you could barely see a foot in front of you. I don’t know how any of us survived the noxious fumes. My dad also poured his own jigs, tied his flies, carved cedar plugs and experimented with more fishing contraptions than you can shake a jig pole at. I still have some of his creations. I usually don’t fish with them, but I keep them lying around my shop here in Maryland. They fit right in with the dozens of half-made lures I hope to finish some day.
When I was a kid, my lure inventions were the result of necessity. Fishing tackle is expensive, and there was never enough money to go 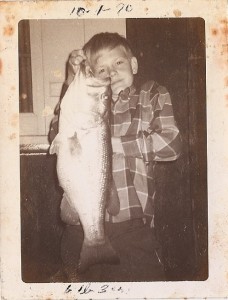 around in those days. Most of the store-bought lures in my hand-me-down tackle box were plugs I found along the lake or river bank. A newer lure was a genuine prize, but most of my plugs were sanded down and repainted. In fact, I painted over almost all of my lures because I came to rely on my personal patterns more than the some of the fancy colors offered by the manufacturers. I’ve since regretted some of my juvenile attempts at plug improvement because a few of those old wooden lures have become valuable collectors items. On the other hand, my experiments led to some very nice fish!
I’m still making lures. One reason is that fishing tackle is still very expensive. I can’t help but grimace when I pay five dollars for a lead jig or more than twice that for a top-water popper. I figure we never really own fishing lures; rather, we’re just caretakers before they’re sacrificed to the gods of fishing. It’s especially hard to keep lures in the summer because of the abundance of bluefish in the Chesapeake Bay. Blues have very sharp teeth that will slice through a thirty pound leader faster than a weed-eater through a Morning Glory vine. Blues will attack a swivel or even a leader knot. I’ve even seen them go after the wake where the fishing line enters the water. Lures don’t last long when blues are around.
 I’m not sure expense is solely to blame for my current lure making habit. After all, it’s nothing to drop fifty bucks for gas on a fishing trip anymore. Should anyone really fret that much over a five dollar jig? I really enjoy the process of designing my lures, then putting them to use to catch fish (or not). I’m sure it’s cliche in fishing circles to mention how rewarding it is to hook-up on a lure made with your own hands, but there’s no denying that it’s one of the most satisfying experiences an angler can have.
Fortunately, lure making is fun and easy to learn. You don’t need a degree in art or engineering. I know some fishermen who are absolute craftsmen when it comes to lure making. They are perfectionists who have refined the process to a fine art. I admire their work and envy their patience in creating the perfect lure, but my creations are never that refined.
In my opinion, no matter how beautiful the lure, it must first and foremost catch fish. Since lure manufacturers have spent decades and sometimes even centuries refining their designs, I doubt seriously that I’m going to come up with anything that will out-fish most of the store-bought classics. Still, there aren’t too many companies that are making lures specifically for fishing in the Chesapeake Bay. There are certain situations and fish behaviors in the Bay that fishermen won’t often encounter in other regions. I’ve found that I can be a more successful Chesapeake fisherman by modifying or designing some of my own lures.
Strike Triggers
In over 40 years of fishing I’ve learned that fish key in on specific strike triggers. These triggers trick the fish into impulse 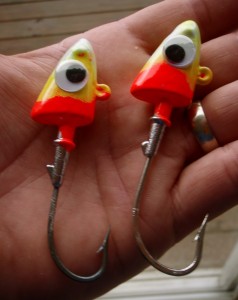 strikes so that they’ll attack a lure even when they’re not particularly compelled to do so. Strike triggers don’t matter too much when fish are actively feeding. During those times they’ll respond to almost anything that moves and remotely resembles bait. On the other hand, there are times when it’s tough to get fish to react to any kind of lure. Since the ability to catch fish when they aren’t biting is what distinguishes good fishermen from mediocre ones, understanding strike triggers is important.
Fish rely on a combination of senses when seeking food. Sight, sound, smell, and taste all play a part in determining whether a fish will take your bait. I’ll cover each of these individually in another article, but for now, let’s look at sight. A fish’s eyes work much the same way human eyes do. They have rods and cones which allow them to distinguish color. They may even see ultraviolet light that is invisible to us. In my experience, I’ve found contrasting colors on a lure to be an extremely effective strike trigger. If you’ve followed my reports or read any of my articles, you know that I use vivid color contrasts in almost every technique I use. I’m still up to my old tricks of modifying store-bought lures for more contrast. A good example of is hotrodding soft plastics by applying scents and dyes. My trademarked candy corn jig head shows the use of alternating color patterns.
Another good strike trigger is the eye-spot on a lure. I put eyes on most of my homemade lures, and I almost always add eyes to store-bought lures if they don’t have them. I believe fish key in on the eye of their prey just before attacking, so the bigger the eye-spot, the more likely the strike. If the eye isn’t there, the fish might turn away at the last minute, or at least take the bait more gingerly so that it can spit it out faster. Add big eyes to your lures and you’ll catch more fish.
A simple & effective jig
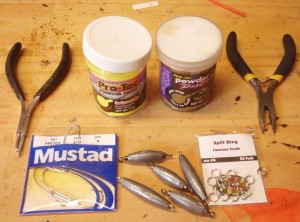 Here’s one simple lure that is guaranteed to catch fish in the Chesapeake Bay. It isn’t anything new. Fishermen have known for decades that a decorated lead weight with a hook attached can be deadly for vertically jigging rockfish in the Bay. In the stores, “trout bombs” or “stingsilvers” are expensive. Fortunately, they are fast, easy, and inexpensive to make.
Start with an elongated lead sinker. They’re sometimes called inline or trolling sinkers. I buy them in various weights from a half-ounce up to two ounces. They’re inexpensive, often sold at bul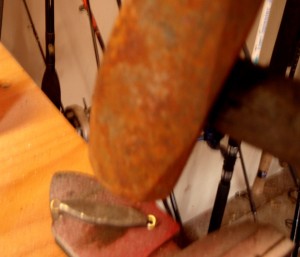 k-lead prices. Store-bought lead usually comes coated with oil, so you’ll want to remove it by washing in dish detergent, or at least wipe it down with a rag before you start.
You can maintain the original shape of the sinker, or modify it. A vice will easily mash it so that the sides are flat, or better yet, just pound it with a hammer. Modifying the shape will make the lure more erratic when it is jigged and often induce more strikes.
The next step is to apply a hook. I use split rings, but you can also buy hooks that have an open eye so they can be crimped right to the jig. If you use split rings, do yourself a favor and buy split ring pliers. They’ll save a lot of time and effort. The size of the hook is important. For summer stripers and bluefish, I use a single hook either 2/0, 3/0, or 4/0. I never use treble hooks for vertical jigging because 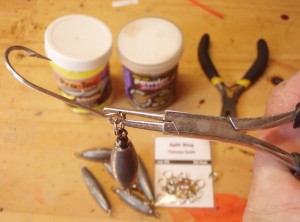 they reduce the action of the lure and frequently cause it to foul or tangle on the line. Stainless steel hooks are unnecessary and bad for the fish because they won’t rust away if swallowed.
Powder Paint
Once the hook is applied, the last step is to simply decorate the lead. There are a number of ways you can add strike triggers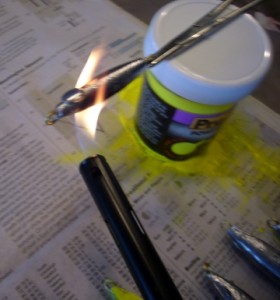 and make the lure look more realistic to the fish. One of my favorites is by powder painting. Powder paint is essentially colored powder that dissolves into a thick smooth paint when it is heated. It is available in most tackle shops. Powder has numerous advantages over standard lure paint including ease of use, durability, drying speed, simple cleanup and ease of mixing colors.
Some lure makers use a device called a fluid bed to apply powder paint because it more evenly coats the lures and speeds up the process. Lures painted with fluid beds can look very professional. In fact, it’s how most of the major jig manufacturers coat their lures. Fluid beds work by creating an air chamber where the paint is suspended. Don’t worry if that sounds too complicated or expensive. Fluid beds are nice, but you don’t need them unless you’re a perfectionist and want extremely nice looking lures, or you’re planning on mass producing your creations. For making a few lures at a time, here’s how it’s done:
Heat your jigs by holding them above a candle, a long handled charcoal lighter or a similar source of relatively low heat. A Bic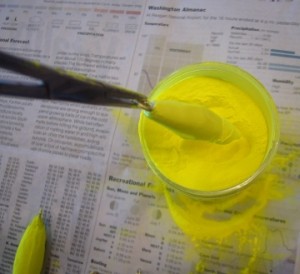 lighter is hot enough, but will get too hot to hold in your hand. A propane torch will melt your lead. You can also heat your jigs for about 15 minutes in a toaster oven set to 350 degrees. Once the lead is well heated on all sides, quickly swish it through the paint with a side-to-side motion so that it is thoroughly coated. Knock off the excess by tapping it on the side of the jar.
You should see the paint quickly melt on the lure. If the paint still looks powdery, the lead isn’t hot enough. If the paint smokes, it’s too hot. The paint will dry and harden quickly. You can create contrasting colors at this point by quickly dipping it in another container of paint. After the lure is painted, hang it up and let it dry. To further harden the paint for extra durability, cure the lures for a little while by hanging them in an oven at low heat. Put a piece of tin-foil under them in case they drip. I usually don’t cure them because it’s an extra time-consuming step, and these lures are made to be disposable. The finish is durable enough with just one coat of powder paint.
Powder paint settles quickly in the jar, so you’ll want to shake and fluff it up often. It will go on smoother if you transfer it to a shallower 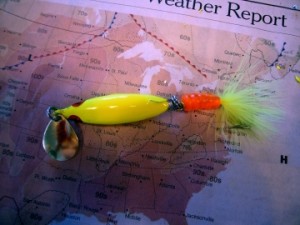 container for application, but that’s an extra step I usually don’t take. Once you get a few painted lures under your belt you’ll start refining the process and see that experimentation is easy. There’s no limit to the combination of colors you can come up with.
Add some flash
Another one of my favorite ways to dress up jigs is even easier than powder painting. I simply cut out strips of flash tape and stick them on the side of the lead. This is an especially effective 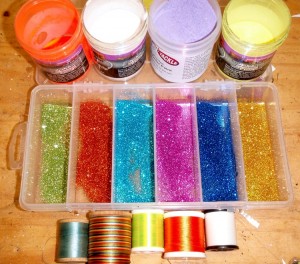 technique for making jigs for Spanish mackerel or bluefish. It also works well for striped bass when they’re feeding shallow or in high sunlight. Flash tape is available in many tackle shops and even in the customizing aisle of most automotive stores. It comes with its own adhesive so you just peel away the backing and stick it on your lures.
Extra-fine glitter is another effective way for making a jig flash. It’s also probably the easiest. If you have kids, there’s probably some glitter around the house somewhere. Just spray your jig with clear lacquer, roll in the glitter, then spray it again and let it dry. Most of my late summer Spanish mackerel come on this type of simply-made glittered jig. Mac lures are the only ones on which I’ll use treble hooks.
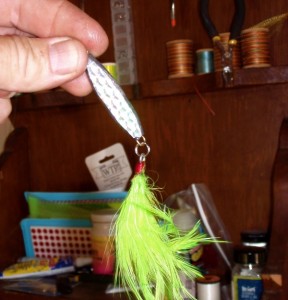 Sometimes I dress my jigs even more by tying a bucktail or feather dressing on to the hook. Here again, I keep the strike triggers in mind and almost always go with a contrasting color. My favorite colors for fishing in the Bay are chartreuse, white, and orange although I’ll sometimes use blue, red, and pink. I experiment with different colored thread, again almost always a contrasting color.
In addition to making lead jigs, I dabble a little with other types of lures. I pour almost all of my jig heads, tie my flies, and occasionally experiment with top-water plugs. Try some yourself and you’ll see how easy it can be. The lure-making learning curve isn’t very steep and the knowledge you’ll gain is invaluable. Once you start to get a handle on what works and doesn’t with your homemade creations, it’s a lot easier to select effective store-bought lures. So give it a whirl and get some of your own half-made lures lying around. Oh, and if you come up with something that’s especially effective, please share your technique!


Great info. Thanks.
Nice article! Lets have a beer when I get back from Alaska.
great article,, i was trying to learn how to tie the bigger parachute lures,,as how to tie the 8 inch nylon to the big 6 ounce lead head jig.seems like i am not to sure how to keep the nylon rapped onto the jig or i need a xtra hand. thanks!
great article… i was wondering if you could let me know .. what do you use for holding the nylon hair onto the jigs of a large 6 ounce jighead,,,,
That is amazing how all of that stays with you. I needed a few buck-tails for an outing on Tims this past week. Tied 4 rather quickly after gobbling down my sandwich during lunch on Tuesday. Turned out half way decent. I think Dad would be proud.
Enjoyed the article! I will be going to the “Big G” this weekend for a shot at a match of your largemouth from the 1980 shot. I will just about bet you that big eyed red popper would do the trick. Send it to me to try and I will send it back with some teeth marks and a pic of the evidence!
Creig,
Remind the folks on the “Big G” that there’s a new sheriff in town in Knoxville, and The Crimson Tide’ll be rolling on back out pretty soon…..
As alwyays, your articles heighten our need to ‘go fishing’. Where do you purchase your eyes at? Anglers in Annapolis didn’t have them last time i went there? thanks, Rick
77EC8S ezpzztuaqeen, [url=http://belpbynnmygq.com/]belpbynnmygq[/url], [link=http://jsnifvphpnqv.com/]jsnifvphpnqv[/link], http://rnybozhndatg.com/
Perfect work!,
Great. Now i can say thank you!,
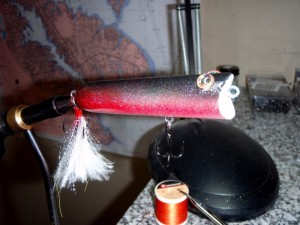
Hi there, I’m pretty good friends with your brother Creig. We usually do a descent bit of fishing here, That is when we both have the time off. I am just getting into your articles and I was just wondering, how did you paint the popper in the Third picture there? By the way nice article.
Nick, all I used was regular spray paint, but stood way back so just the finest part of the mist hit the lure. I’ve been thinking about buying an airbrush for lures, but haven’t done it yet.
Hey Shawn,
Bought yer book to help fishing at Kiptopeke in December when eeling wasn’t. My usual fishing for crappie and stripers is Kerr Reservoir in Southern VA. Chesapeake striper fishing is a fever that burns all year. Being at Kiptopeke when the big girls are is often near impossible. So, need other approaches than eeling. This year, my stay at the 1/2 star Kiptopeke Inn was rewarded by talks with several charter captains that did fly and light tackle for stripers. Even a seminar with Walleye Pete. This was my first venture to the 4th island and pilings to the High Rise. Needless to say, I didn’t do well as a novice. Nor have I been accepted into a network after 3 years attendance at the event. I need a couple of molds and hook sizes. My druther would be that you posted the exact hook to match a specified mold. I cast bullets for Cowboy Action Shooting like seems forever. I’m too old and far from civilization to frequent great tackle shops in the Baltimore area. Not too old to enjoy making tackle or get excited with vicarious adventures on Chesapeake. Thanks for making it possible. Joy – Scottsburg, VA
thanks i enjoyed the lesson